はじめに
DMMグループ Advent Calendar 2023 の5日目を担当する柳元(@toshi_ios_jp)です。現在、私はプラットフォーム事業部 DMM Pointclub アプリチームでiOSエンジニアをしています。
業務の中で、複数行カルーセルを作る必要がありました。SwiftUIを用いれば少ないコードで簡単に実装することができます。本記事では、その実装の流れを説明していきたいと思います。
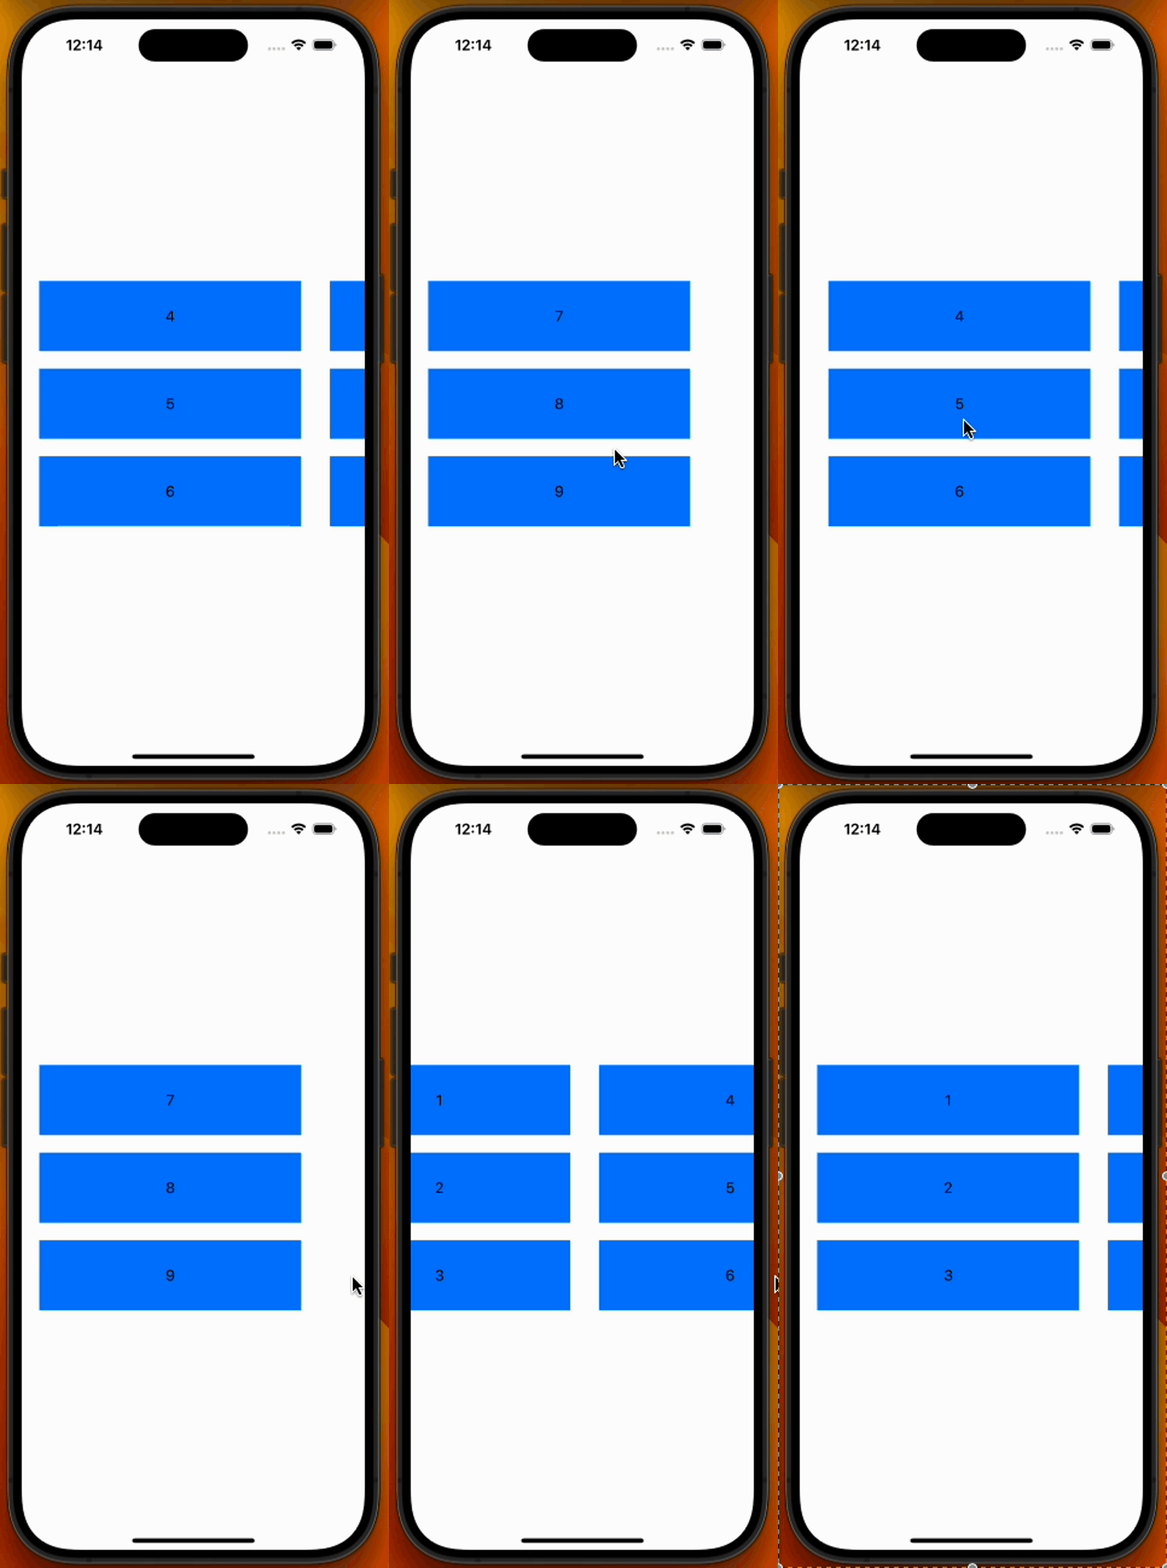
最終的に実装するもの
仕様:
- 複数行のカルーセル
- ドラッグジェスチャーで横スクロールできる
- 時間経過で自動で横スクロールする(自動スクロール無しの設定も可能)
1行のカルーセル
まず、複数行のカルーセルを実装するにあたり、1行のカルーセル実装を行なっていきます。
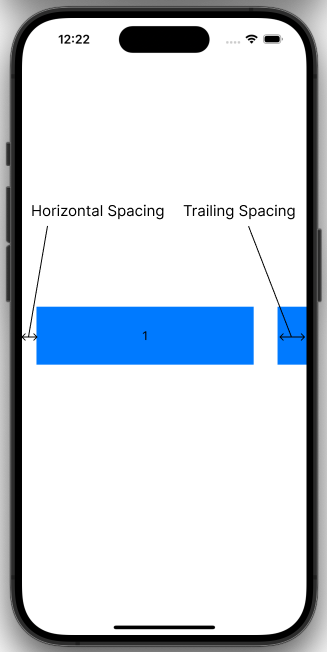
SingleRowCarouselのパラメータの配列 items にカルーセルに表示したいデータを入れます。Spacingは上図の部分を指し、カスタマイズできるようにします。
1行のカルーセル実装:
import SwiftUI

public struct SingleRowCarousel<Content: View, T: Identifiable>: View {
    private let content: (T) -> Content
    private let items: [T]
    private let horizontalSpacing: CGFloat
    private let trailingSpacing: CGFloat

    @Binding private var index: Int
    @GestureState private var dragOffset: CGFloat = 0

    public var body: some View {
        GeometryReader { proxy in
            let pageWidth = (proxy.size.width - (trailingSpacing + horizontalSpacing))
            let currentOffset = dragOffset - (CGFloat(index) * pageWidth)

            LazyHStack(alignment: .top, spacing: 0) {
                ForEach(items) { item in
                    content(item)
                        .frame(width: pageWidth, alignment: .leading)
                }
            }
            .padding(.horizontal, horizontalSpacing)
            .offset(x: currentOffset)
            .gesture(
                DragGesture()
                    .updating($dragOffset) { value, state, _ in
                        if (index == 0 && value.translation.width > 0) || (index == items.count - 1 && value.translation.width < 0) {
                            state = value.translation.width / 4
                        } else {
                            state = value.translation.width
                        }
                    }
                    .onEnded { value in
                        let dragThreshold = pageWidth / 20
                        if value.translation.width > dragThreshold {
                            index -= 1
                        }
                        if value.translation.width < -dragThreshold {
                            index += 1
                        }
                        index = max(min(index, items.count - 1), 0)
                    }
            )
            .animation(.default, value: dragOffset == 0)
        }
    }

    public init(items: [T], horizontalSpacing: CGFloat, trailingSpacing: CGFloat, index: Binding<Int>, content: @escaping (T) -> Content) {
        self.content = content
        self.items = items
        self.horizontalSpacing = horizontalSpacing
        self.trailingSpacing = trailingSpacing
        self._index = index
    }
}
呼び出し側の実装例:
import SwiftUI

struct CarouselItem: Identifiable {
    let id = UUID()
    let value: Int
}

struct ContentView: View {
    @State var currentIndex = 0
    let items = [CarouselItem(value: 1), CarouselItem(value: 2), CarouselItem(value: 3)]

    var body: some View {
        SingleRowCarousel(
            items: items,
            horizontalSpacing: 20,
            trailingSpacing: 40,
            index: $currentIndex)
        { item in
            Text("\(item.value)")
                .frame(width: 300, height: 80)
                .background(Color.blue)
        }
        .frame(height: 80)
    }
}

#Preview {
    ContentView()
}
上記のSingleRowCarouselは汎用的に用いることができるように、ジェネリクス<Content: View, T: Identifiable>を使用しています。
Contentはカルーセルの各アイテムのViewを定義し、Tは表示すべき各アイテムのデータを表しています。Identifiableプロトコルに準拠した型にすることで、各アイテムに一意のIDを提供し、Viewを一意に識別することが可能となります。
indexは、現在のページのインデックス(表示中のアイテム)を保持します。
dragOffsetは、ユーザーが行っているドラッグ操作の現在のオフセットを保持します。
DragGestureを使用して、ユーザーのドラッグ操作を監視します。.updatingでdragOffsetの更新を行っています。ページの先頭・末尾でスクロールできない場合は、ドラッグの移動量を小さくすることでスクロールできないことを表現しています。
.onEndedでドラッグが終了したときの処理を記述します。スクロールのしやすさをdragThresholdで制御し、ドラッグの移動量が閾値を超えていた場合にページの切り替えを行います。
また、.animationを用いて、ユーザーがドラッグを終えた時にページの切り替えがアニメーションで行われるようにしています。
複数行のカルーセル
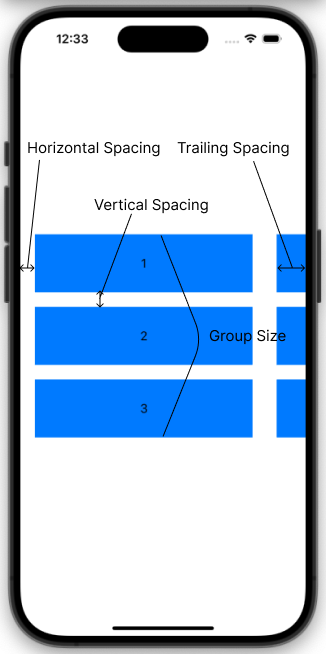
次に、上記の1行のカルーセルを複数行のカルーセルに書き換えていきます。パラメータとしてgroupSize, verticalSpacingを追加しています。
複数行のカルーセル実装:
import SwiftUI

public struct MultiRowsCarousel<Content: View, T: Identifiable>: View {
    private let content: (T) -> Content
    private let items: [T]
    private let groupSize: Int // 追加
    private let horizontalSpacing: CGFloat
    private let verticalSpacing: CGFloat // 追加
    private let trailingSpacing: CGFloat

    private var chunkedItems: [[T]] // 追加

    @Binding private var index: Int
    @GestureState private var dragOffset: CGFloat = 0

    public var body: some View {
        GeometryReader { proxy in
            let pageWidth = (proxy.size.width - (trailingSpacing + horizontalSpacing))
            let currentOffset = dragOffset - (CGFloat(index) * pageWidth)

            LazyHStack(alignment: .top, spacing: 0) {
                ForEach(chunkedItems.indices, id: \.self) { index in
                    LazyVStack(alignment: .leading, spacing: verticalSpacing) {
                        ForEach(chunkedItems[index]) { item in
                            content(item)
                        }
                    }
                    .frame(width: pageWidth)
                }
            }
            .padding(.horizontal, horizontalSpacing)
            .offset(x: currentOffset)
            .gesture(
                DragGesture()
                    .updating($dragOffset) { value, state, _ in
                        if (index == 0 && value.translation.width > 0) || (index == chunkedItems.count - 1 && value.translation.width < 0) {
                            state = value.translation.width / 4
                        } else {
                            state = value.translation.width
                        }
                    }
                    .onEnded { value in
                        let dragThreshold = pageWidth / 20
                        if value.translation.width > dragThreshold {
                            index -= 1
                        }
                        if value.translation.width < -dragThreshold {
                            index += 1
                        }
                        index = max(min(index, chunkedItems.count - 1), 0)
                    }
            )
            .animation(.default, value: dragOffset == 0)
        }
    }

    public init(items: [T], groupSize: Int, horizontalSpacing: CGFloat, verticalSpacing: CGFloat, trailingSpacing: CGFloat, index: Binding<Int>, content: @escaping (T) -> Content) {
        self.content = content
        self.items = items
        self.groupSize = groupSize
        self.horizontalSpacing = horizontalSpacing
        self.verticalSpacing = verticalSpacing
        self.trailingSpacing = trailingSpacing
        self._index = index

        self.chunkedItems = stride(from: 0, to: items.count, by: groupSize).map {
            Array(items[$0 ..< min($0 + groupSize, items.count)])
        }
    }
}
MultiRowsCarouselでは、パラメータとしてverticalSpacing, groupSizeを追加し、変数としてchunkedItemsを追加しています。
- groupSize: 一つのページに表示するアイテムの数(=行数)
- verticalSpacing: これは各アイテム間の垂直方向のスペース
- chunkedItems: itemsを所定のgroupSizeごとに分割した2次元配列
chunkedItemsの値はitems, groupSizeの値によって決まり、例として次のようになります。
import Foundation

let items = Array(1...9)

let groupSize = 3

let chunkedItems = stride(from: 0, to: items.count, by: groupSize).map {
    Array(items[$0 ..< min($0 + groupSize, items.count)])
}

// chunkedItemsの値
//[
//    [1, 2, 3],
//    [4, 5, 6],
//    [7, 8, 9]
//]
MultiRowsCarouselでは、chunkedItems.indicesに対してForEachループを追加し、各ページに対する縦のStackを作成しています。この内部にもう一つForEachループがあり、それでは各ページ内のアイテムを表示しています。これで、複数行のカルーセルを作ることができました!
自動スクロール機能付きの複数行カルーセル
最後に自動スクロール機能を追加します。
自動スクロール機能付きの複数行カルーセルの実装:
import SwiftUI
import Combine

public enum AutoScrollStatus {
    case inactive
    case active(TimeInterval)
}

public struct MultiRowsCarousel<Content: View, T: Identifiable>: View {
    private let content: (T) -> Content
    private let items: [T]
    private let groupSize: Int
    private let horizontalSpacing: CGFloat
    private let verticalSpacing: CGFloat
    private let trailingSpacing: CGFloat
    private let autoScroll: AutoScrollStatus // 追加

    private var chunkedItems: [[T]]
    private var timer: Timer.TimerPublisher? { // 追加
        switch autoScroll {
        case .active(let timeInterval):
            return Timer.publish(every: timeInterval, on: .main, in: .common)
        case .inactive:
            return nil
        }
    }

    @Binding private var index: Int
    @GestureState private var dragOffset: CGFloat = 0

    @State private var isTimerActive = true // 追加
    @State private var cancellable: AnyCancellable? // 追加

    public var body: some View {
        GeometryReader { proxy in
            let pageWidth = (proxy.size.width - (trailingSpacing + horizontalSpacing))
            let currentOffset = dragOffset - (CGFloat(index) * pageWidth)

            LazyHStack(alignment: .top, spacing: 0) {
                ForEach(chunkedItems.indices, id: \.self) { index in
                    LazyVStack(alignment: .leading, spacing: verticalSpacing) {
                        ForEach(chunkedItems[index]) { item in
                            content(item)
                        }
                    }
                    .frame(width: pageWidth)
                }
            }
            .padding(.horizontal, horizontalSpacing)
            .offset(x: currentOffset)
            .gesture(
                DragGesture()
                    .onChanged { _ in
                        isTimerActive = false
                    }
                    .updating($dragOffset) { value, state, _ in
                        if (index == 0 && value.translation.width > 0) || (index == chunkedItems.count - 1 && value.translation.width < 0) {
                            state = value.translation.width / 4
                        } else {
                            state = value.translation.width
                        }
                    }
                    .onEnded { value in
                        isTimerActive = true
                        let dragThreshold = pageWidth / 20
                        if value.translation.width > dragThreshold {
                            index -= 1
                        }
                        if value.translation.width < -dragThreshold {
                            index += 1
                        }
                        index = max(min(index, chunkedItems.count - 1), 0)
                    }
            )
            .animation(.default, value: dragOffset == 0)
            .onAppear {
                cancellable = timer?
                    .autoconnect()
                    .sink { _ in

                        guard isTimerActive else {
                            return
                        }

                        withAnimation {
                            if self.index >= chunkedItems.count - 1 {
                                self.index = 0
                            } else {
                                self.index += 1
                            }
                        }
                    }
            }
            .onDisappear {
                cancellable?.cancel()
                cancellable = nil
            }
        }
    }

    public init(items: [T], groupSize: Int, horizontalSpacing: CGFloat, verticalSpacing: CGFloat, trailingSpacing: CGFloat, autoScroll: AutoScrollStatus, index: Binding<Int>, content: @escaping (T) -> Content) {
        self.content = content
        self.items = items
        self.groupSize = groupSize
        self.horizontalSpacing = horizontalSpacing
        self.verticalSpacing = verticalSpacing
        self.trailingSpacing = trailingSpacing
        self.autoScroll = autoScroll
        self._index = index

        self.chunkedItems = stride(from: 0, to: items.count, by: groupSize).map {
            Array(items[$0 ..< min($0 + groupSize, items.count)])
        }
    }
}
呼び出し側の実装例:
import SwiftUI

struct CarouselItem: Identifiable {
    let id = UUID()
    let value: Int
}

struct ContentView: View {
    @State var currentIndex = 0
    let items = [
        CarouselItem(value: 1), CarouselItem(value: 2), CarouselItem(value: 3),
        CarouselItem(value: 4), CarouselItem(value: 5), CarouselItem(value: 6),
        CarouselItem(value: 7), CarouselItem(value: 8), CarouselItem(value: 9),
    ]

    let groupSize = 3

    var body: some View {
            MultiRowsCarousel(
                items: items,
                groupSize: 3,
                horizontalSpacing: 20,
                verticalSpacing: 20,
                trailingSpacing: 40,
                autoScroll: .active(3),
                index: $currentIndex)
            { item in
                Text("\(item.value)")
                    .frame(width: 300, height: 80)
                    .background(Color.blue)
            }
            .frame(height: 280)
    }
}
自動スクロール機能付きのMultiRowsCarouselでは、autoScroll, timer, isTimerActive, cancellable が追加されています。
autoScrollプロパティはAutoScrollStatus型の値を保持します。AutoScrollStatus型は自動スクロールの状態を表すenumで、自動スクロールが非活性(.inactive)か、あるいは一定の時間間隔で活性(.active(TimeInterval))であるかを表します。
timerは、autoScrollの状態に基づき、一定の時間間隔でTickを出力するタイマーを作成します。タイマーはTimer.TimerPublisher型で、Combineフレームワークを使用しています。
isTimerActiveはタイマーが動作中かどうかフラグです。ユーザーがドラッグを行っている間(DragGesture().onChanged)でタイマーを一時停止し、ドラッグが終了した時(DragGesture().onEnded)にタイマーを再開します。
cancellableは、タイマーのpublisherの購読を管理します。onAppear時にタイマーの購読を開始し、onDisappear時に購読をキャンセルします。
以上で、自動スクロール機能付きの複数行カルーセルが完成しました!
まとめ
このようにSwiftUIで自動スクロール機能付きのカルーセルは簡単に実装することができます。SwiftUI最高ですね!
December 05, 2023 at 12:06PM
https://ift.tt/IcUzk2a
SwiftUIで作る複数行カルーセル - DMM inside
https://ift.tt/Ezh3sU6
Mesir News Info
Israel News info
Taiwan News Info
Vietnam News and Info
Japan News and Info Update
Bagikan Berita Ini


0 Response to "SwiftUIで作る複数行カルーセル - DMM inside"
Post a Comment